 Loading... Please wait...
A smooth-running capping machine is the backbone of an efficient production line. When caps are applied correctly, they ensure product freshness, prevent contamination, and maintain your brand’s professional appearance. But when even a small detail goes wrong—like misalignment or torque inconsistency—it can ripple through your operation, slowing production, wasting materials, and creating costly downtime.
Capping machines are designed to handle repetition, precision, and speed, but even the best equipment demands attention. Recognizing the root causes of common problems and applying the right fixes keeps your operation consistent, your costs down, and your output dependable.
More importantly, if you learn how to prevent these problems in the first place, you can help keep your line running at peak performance.
11 Common Problems with Bottle Cappers & How to Solve Them
Capping issues can stem from mechanical wear, environmental conditions, incorrect settings, or overlooked maintenance. Knowing what to look for and how to respond quickly saves valuable time and prevents product loss.
1. Misaligned Bottle Caps or Bottles
Misalignment is one of the most frequent and visible capping machine problems. It usually shows up as skewed caps, tilted closures, or cross-threading, which can compromise seals and cause leaks. This misalignment often happens when guide rails or starwheels are worn, when bottles aren’t properly centered, or when timing is off between the center column star and capping heads.
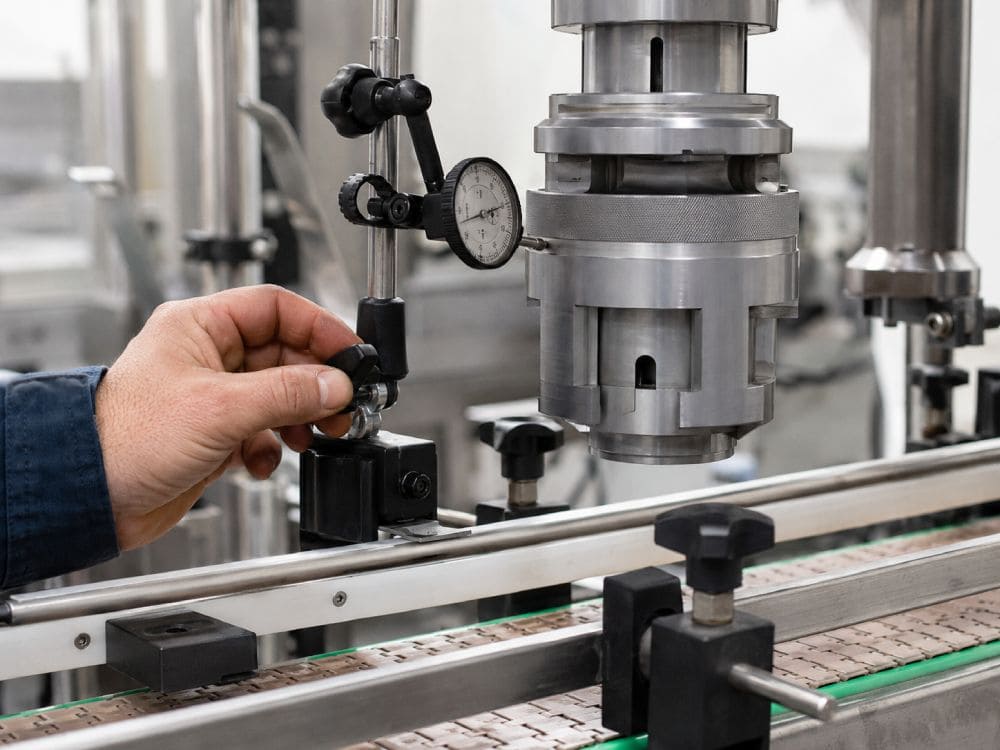
Making sure bottles enter the capping turret straight and centered is key to preventing repeat issues. The first step is to slow down the line and observe where misalignment occurs, such as during bottle transfer, cap pickup, or chuck engagement. Use alignment tools or gauges to confirm bottle centering. The solution may be as simple as readjusting guide rails, tightening worn fasteners, or recalibrating the chuck.
2. Incorrect Torque (Under- or Over-Torque)
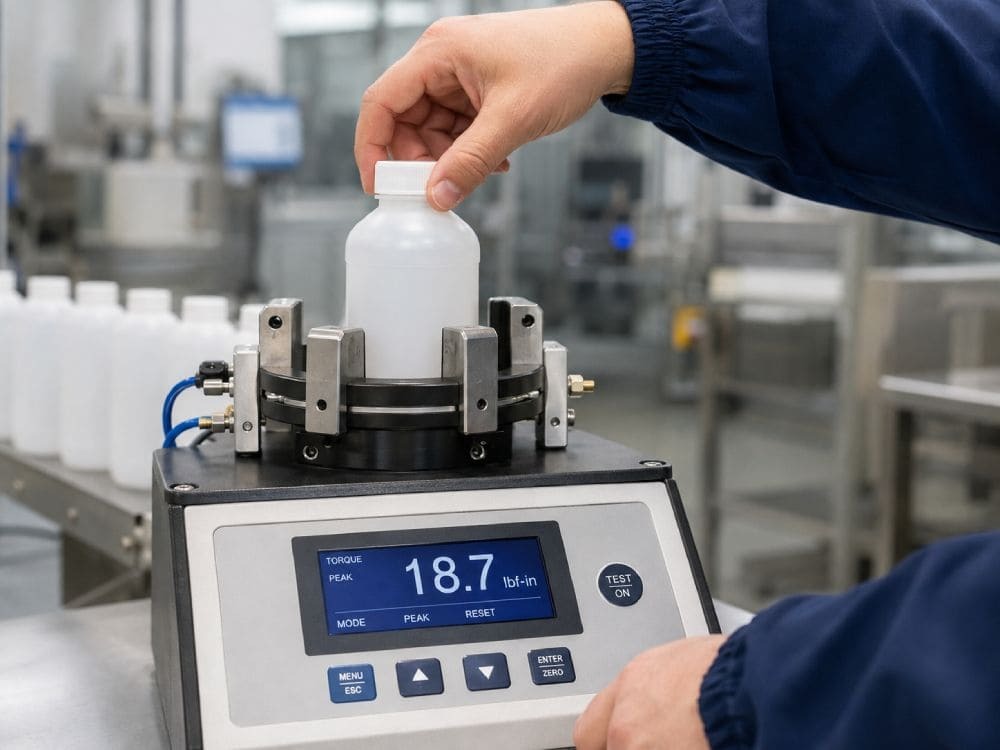
Applying too little torque can lead to loose caps and leaks, while too much torque can deform or strip caps, damaging both packaging and product integrity. Inconsistent torque is often caused by worn spindles, slipping clutches, or unstable air pressure.
Consistent torque testing checks that every cap meets spec, which helps prevent rejected batches and consumer complaints. Start by checking torque readings at different intervals and verifying that air pressure remains stable throughout the run. Inspect chuck inserts or spindle discs for wear and confirm top-load pressure is set properly. The best fix is often incremental—small torque adjustments combined with part replacements where necessary.
3. Spindle Disc Issues
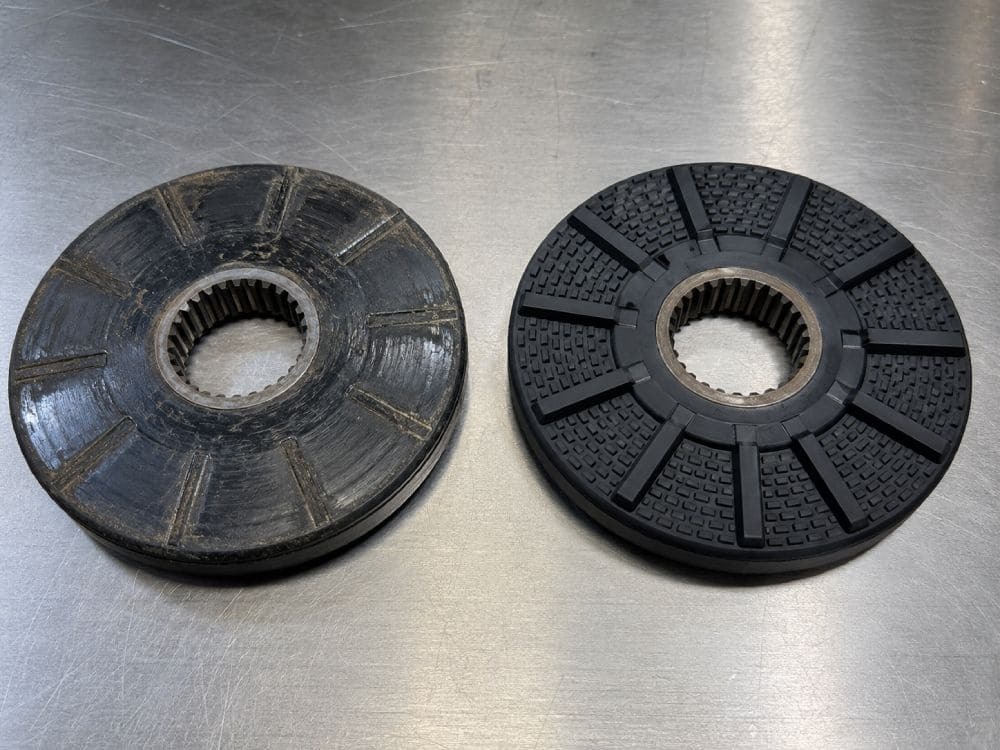
Over time, spindle discs wear down or become glazed, reducing their ability to grip caps properly. As a result, caps can slip or scuff during application. If you notice uneven torque or visible marks on caps, the spindle discs are a likely culprit.
Maintaining proper belt tension and using the right disc material for each cap type ensures optimal performance and extends disc lifespan. Inspect discs closely for surface wear or buildup. If they’re smooth and shiny, they’ve likely lost traction. Cleaning may help temporarily, but replacement is often necessary.
4. Worn Parts
Like any moving machinery, cappers rely on components that wear over time. Chucks, bearings, bushings, belts, and springs are especially vulnerable. When these parts degrade, the entire system loses precision, resulting in inconsistent application, vibration, and increased downtime.
Fortunately, preventative replacement reduces emergency maintenance and extends your machine’s operational life. Regular inspection is crucial. Check for visible wear, unusual noise, or vibration during operation. Create a schedule to replace high-wear components before they fail, and maintain a spare parts inventory for rapid swaps.
5. Misaligned Components
If your capper has been recently serviced, cleaned, or changed over for a new stock keeping unit (SKU), even slight misalignment can disrupt performance. Loose fasteners or uncalibrated assemblies can cause the machine to cap off-center or apply uneven torque.
A few minutes spent realigning today can prevent hours of downtime tomorrow. A dial indicator or alignment gauge helps verify that chucks, guide rails, and starwheels are positioned correctly. After adjustments, always run test bottles to confirm smooth, consistent capping.
6. Incorrect Speeds
When line speeds drift out of sync, the capper begins to fight upstream and downstream equipment. Bottles may arrive with too much back pressure or with gaps that starve the starwheel. The capping head then meets the closure at the wrong moment, which shows up as skating caps, crushed threads, or erratic torque readings. Running too slowly has a cost as well: dwell and top-load stay engaged longer than intended and small variations become big defects.
Start by watching each handoff: filler discharge to infeed screw, infeed screw to starwheel, and starwheel to the capping head. Compare actual speeds on drives and human-machine interfaces (HMIs) rather than relying on setpoints. Bring capper revolutions per minute (RPM) back into the validated range, lengthen dwell slightly for stubborn closures, and tune accumulation to smooth pressure waves.
If the plant sees frequent speed changes due to upstream variance, consider a short buffer zone or back-pressure relief that isolates the capper from those fluctuations.
7. Bottle Instability
Tall, lightweight, or high-friction containers magnify tiny setup errors. If guide rails are even slightly wide, or if top-load is off, bottles wobble under the capping head, and the threads never mesh cleanly. Labels can act like a lubricant on side guides or the opposite, grabbing and sticking at transfer points. Either way, instability turns a small lean into a persistent skew.
Stability starts with control. Gauge rails so they contact evenly along the label panel without pinching. Verify conveyor planarity and remove excess back pressure, then tune top-load to steady the finish without deforming the container.
For challenging SKUs, pocketed starwheels, a short timing screw to settle bottles, or friction-enhancing rail materials can transform behavior. If problems return mid-run, look for temperature swings or line-speed changes that alter bottle behavior and adjust top-load or screw timing accordingly.
8. Faulty Sensors
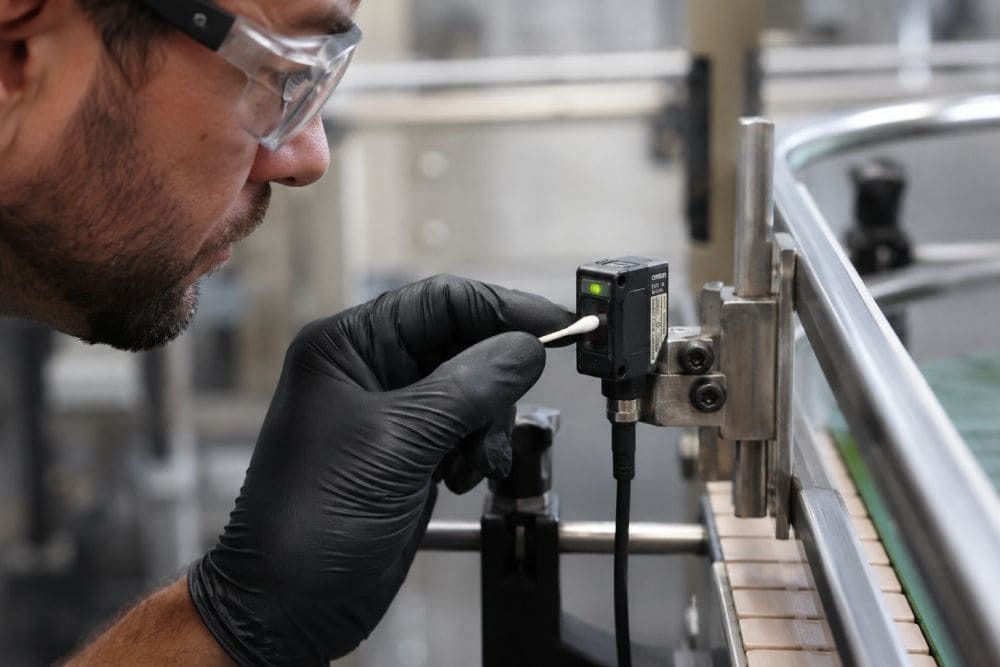
Sensors act as the nervous system of modern cappers. When they drift, otherwise healthy machines behave unpredictably: Good product is rejected, real faults slip by, and operators chase ghosts. Dust, adhesive mist, vibration, and cable fatigue are common sources of intermittent behavior that looks mechanical at first glance.
Treat sensors and their cabling as items with service intervals. Clean lenses on a set schedule, verify brackets have not crept, and check status light emitting diodes (LEDs) while the machine is in motion. If a detection seems intermittent, swap in a known-good sensor to isolate the issue quickly. Re-teach or recalibrate vision systems after major changeovers or lighting changes, and add shielding or improved grounding if noise shows up as false triggers. Document sensitivity settings so they can be restored after maintenance.
9. Cap Detection or Rejection Faults
Detection and rejection only work when timing and geometry are precise. If the sensor views the target too early, good bottles get rejected; too late, defects ride through. Over time, valves, paddles, and air knives also change behavior as seals wear and springs fatigue, shifting the angle or force of the reject.
Re-establish the reference before changing recipes. Verify sensor distance and angle to the bottle path, then run a controlled challenge with known good and bad samples. Observe the reject event at reduced speed to confirm clearance and follow-through. Adjust the actuation window in the programmable logic controller (PLC) or HMI and replace sticky valves or worn diverters. For high-risk lines, add a positive verification sensor downstream to confirm that rejects actually left the flow.
10. Cap Jams
Few events stop production faster than a jam in the cap feed. Static, burrs on molded caps, worn bowl tooling, or a polished spot in the chute can encourage caps to nest and bridge. The result is starved capping heads, empty bottles, and torque readings that fall off a cliff.
Walk the entire path a cap travels and look for witness marks. Inspect bowl tracks and escapements for wear, and check orientation yield to be sure the bowl is presenting caps correctly. A careful deburr and polish can remove catch points. Reduce static with ionization bars or grounding straps, especially in dry seasons. Tune feed rates so the elevator or bowl maintains a steady buffer without overloading the chute. If jams recur with a specific lot, quarantine it and share samples with your supplier for tooling review.
11. Product Residue
Residue on the finish or threads is a stealth cause behind many leaks and torque complaints. Sugary syrups, oils, cleaners, and solvents change friction during application and then attract dust, fouling chucks, discs, and sensors. Even small amounts can undermine sealing and make troubleshooting misleading.
Build cleanliness into upstream and capper-adjacent steps. Add a wipe station or air-knife immediately before capping and tighten controls on filler overflows and drip timing. Schedule quick clean-and-inspect cycles on the capping head, including the underside of chucks and spindle discs, and track when residue appears to identify patterns tied to specific SKUs or temperatures.
When residue returns after cleaning, revisit nozzle design, snift timing, and container handling to eliminate the source rather than treating symptoms.
A Step-by-Step Capping Machine Troubleshooting Checklist
Even the most experienced operators encounter issues that need quick diagnosis. A consistent troubleshooting workflow helps identify the root cause instead of chasing symptoms.
Use this process whenever the capper shows signs of inconsistent performance, rejected bottles, or unusual sounds. It’s designed to help operators verify mechanical, electrical, and environmental factors in sequence before escalating the problem.
- Document the symptom with clear photos, samples, and timestamps.
- Verify safety before inspecting moving parts.
- Check basics: air pressure, electrical power, sensors, and bowl levels.
- Confirm setup by verifying change parts and correct recipe.
- Run at jog speed to observe problem points.
- Isolate variables (speed, torque, top load, etc.) one at a time.
- Measure outcomes using torque analyzers or leak tests.
- Inspect wear parts such as chucks, spindles, and belts.
- Check alignment using guides, timing marks, and gauges.
- Record all actions and escalate with data if the issue persists.
Following this routine minimizes guesswork. Additionally, documenting each step makes patterns easier to spot and shortens the path to permanent fixes.
Preventative Maintenance Schedule to Extend Bottle Capper Lifespan
Capping machines perform best when kept clean, calibrated, and properly lubricated. Preventative maintenance not only reduces downtime but also improves product quality and operator safety. Each maintenance interval—daily, weekly, monthly, and beyond—serves a distinct purpose in preserving the life and accuracy of your equipment.
Daily
Daily maintenance focuses on keeping the machine clean and stable. Removing debris, tightening fasteners, and checking key performance indicators prevents small issues from escalating.
- Clean capping heads, belts, and guides.
- Verify stable air pressure and dry filters.
- Spot-check torque consistency.
- Inspect sensors for dirt or misalignment.
Performing these simple steps ensures your equipment starts each shift in optimal condition. Clean components also make it easier to identify wear or misalignment before it causes failures.
Weekly
Weekly maintenance provides a chance to inspect and adjust components that experience moderate wear. This routine keeps mechanical systems consistent and reliable.
- Clean the cap feed system thoroughly.
- Inspect chuck inserts and spindle discs for wear.
- Confirm bottle height and top load settings.
- Review torque profile data.
Weekly reviews catch gradual torque drift, cap slippage, or early-stage wear. It’s also an ideal time to recalibrate your torque tools and review operator logs for anomalies.
Monthly
Monthly maintenance targets deeper mechanical and pneumatic systems. It reviews that lubrication and mechanical health are intact.
- Lubricate bearings and mechanical joints.
- Inspect belts, pulleys, and timing screws.
- Verify regulator calibration and air system dryness.
These checks prevent vibration, belt misalignment, and uneven wear. Maintaining proper lubrication reduces friction and extends component life.
Quarterly or Semiannual
Quarterly or semiannual maintenance sessions address alignment, part replacement, and performance optimization.
- Rebuild capping heads and spindles as needed.
- Perform full alignment checks.
- Back up machine parameters and update records.
- Audit spare parts inventory.
This in-depth inspection promotes long-term consistency and reliability. Periodic rebuilds and recalibrations restore precision and prevent larger failures.
Bottle Capping Machine Issues: When to Call for Support
Even well-maintained cappers have limits. Some faults demand specialized tools, original equipment manufacturer (OEM) drawings, or application expertise that goes beyond routine troubleshooting. Calling early prevents collateral damage, reduces scrap, and returns the line to steady production faster. Think of external support as an extension of your team that brings deep pattern recognition and access to parts and procedures you may not keep on hand.
When deciding whether to escalate, consider the cost of continued trial-and-error: wasted materials, operator time, and the risk of compounding the fault. If a problem has resisted one full pass through your troubleshooting workflow, or if safety, compliance, or equipment integrity are in question, it’s time to bring in help.
If There’s Major Wear or Damage
Structural cracks, bent spindles, broken springs, or excessive play indicate components are past safe service life. Continuing to run risks secondary failures, such as seized bearings that damage shafts or misalignment that chews up starwheels.
Pause production, document conditions with photos and runout measurements, and coordinate a planned repair before a forced outage creates a bigger problem.
If You’re Seeing Electrical or PLC Issues
Servo faults, encoder drift, intermittent input/output (I/O), and recipe corruption require diagnostic software and programming access. These faults often masquerade as mechanical problems, such as variable torque or random stops, but the root cause lies in motion tuning or noisy inputs.
A controls technician can review error logs, scope signals, and retune motion profiles to restore repeatability and eliminate nuisance trips.
If There Is Persistent Performance Deviation
If torque scatter, skewed caps, or reject rates return after you have replaced wear parts and verified setup, suspect calibration, environmental, or compatibility issues. Examples include regulator creep, clutch heat fade, and closure or bottle variation between material lots.
External support can run deeper audits, from torque trend analysis to environmental studies, and help set new control limits or specifications that fit real-world conditions.
If You’re Preparing for Changeovers & New Closures
Launching a new SKU or closure style affects more than starwheels. Liner materials, thread profiles, and cap geometry change torque curves and engagement dynamics.
Involving an applications engineer early ensures the right change parts are specified, torque windows validated, and cosmetic quality protected during ramp-up. A short on-site trial can save weeks of tinkering later.
If You Want to Check Safety, Compliance, & Validation
Regulated environments and high-risk operations often require third-party verification after significant repairs or recipe changes.
Support teams can provide validation protocols, calibration certificates, and documentation packages to satisfy internal quality assurance (QA) and external auditors. This process reduces release risk and shortens the path from maintenance to full production.
If Chronic Jam or Downtime Patterns Emerge
If the line experiences recurring jams, frequent micro-stops, or patterns of downtime tied to specific SKUs or shifts, outside help can accelerate root-cause analysis.
A fresh set of eyes plus high-speed video review, materials testing, and tooling inspection can reveal interactions that are hard to see from inside the process. The goal is to replace firefighting with a durable corrective action plan.
Shop High-Quality New & Used Cappers at Change Parts
Reliable capping doesn’t happen by accident. It’s the result of consistent maintenance, quality components, and expert support. A disciplined troubleshooting process helps your machines operate efficiently, but having the right partner keeps you prepared for every situation.
Change Parts offers OEM-quality replacement components, custom change parts, and both new cappers and used bottle capping equipment. Whether you need quick part replacements, tooling audits, or complete system upgrades, our team can help restore precision and extend your equipment’s life.
Contact us today to maintain your uptime, protect your brand, and keep your line running.


